This shows how to set up the apps and get running. This page gives you a 10-minute overview of the important features. Clicking on a more details link will give you further information as well as why certain design decisions were made.
We strongly suggest you read both the privacy policy and legal information pages to get a good understanding of the base principles of the system
Preparation
This shows what you need to run the app. Unlike most other mobile-based apps there is a desktop component required for adding your music and choreography to your account. If you just wish to view the data of programmes you can download only the iOS app.
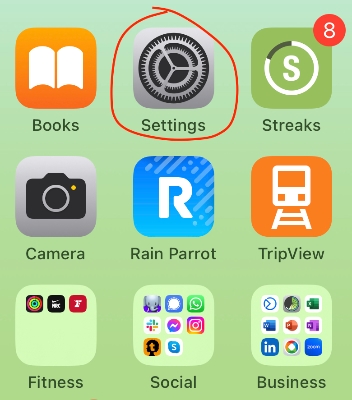
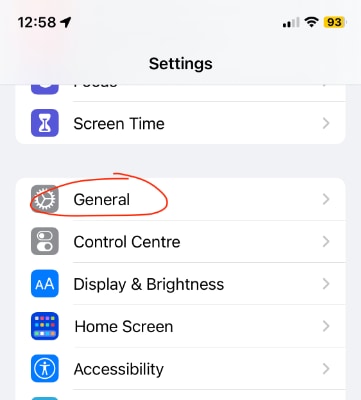
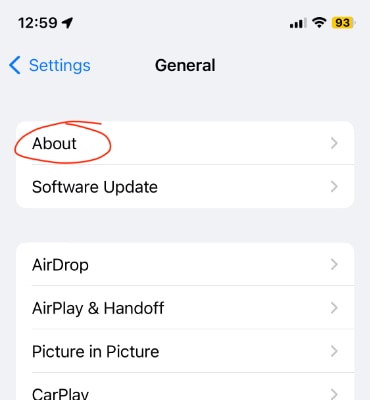
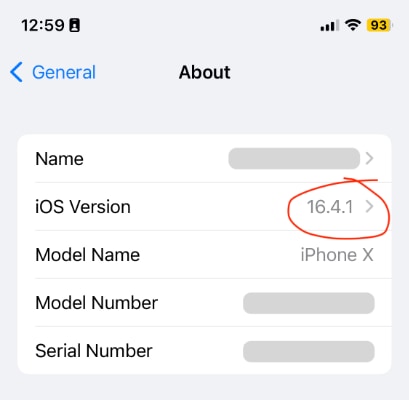
To run you will need an iOS device – iPhone, iPad, iPod touch – that is capable of running iOS 16 or later. You can check this by going into the Settings app, tapping the General item, then the About item.
If you are going to add your music and choreography you will also need either:
- a Mac running macOS 13 (also known as Ventura) or later
- a PC running Windows 10 or later
The iOS app can be downloaded from the App Store here. The Mac app and the Windows app are available for download from here.
Just browsing
If you are not logged in to the app you will see all the programmes supported by the app. You can see the contents of these and also view some general reports. This is what you will always see even if you don’t create an account or add any media.
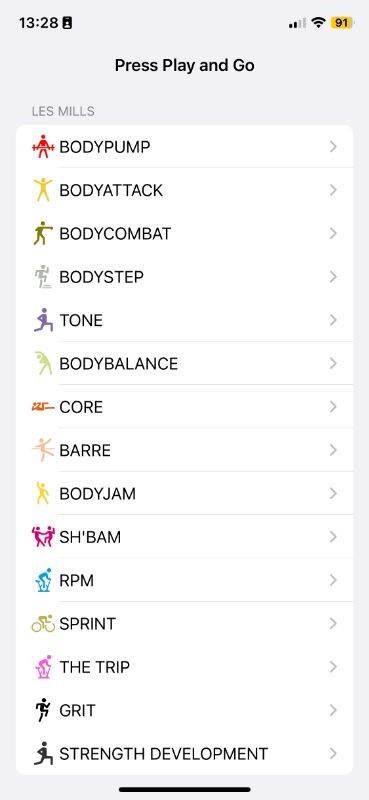
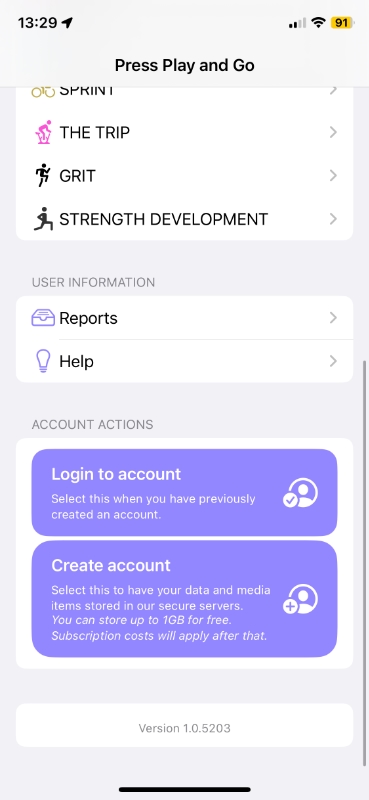
In the first screen you can see the home page showing all the programmes currently supported from a particular vendor. As more vendors and their programmes are added they will appear here. The second panel shows the bottom of the home page where you can look at the general reports, view on-device help, and get started with your account on the device.
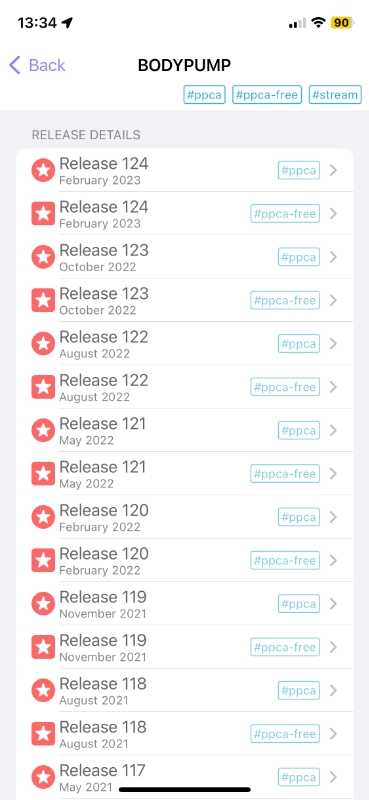
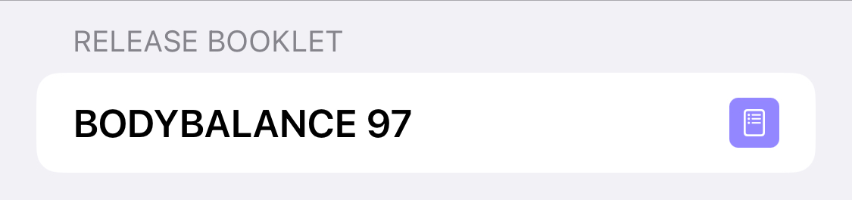
The third panel shows the high-level contents of a programme. You can see the available releases along with the relevant music licences (see next section for more details).
Note that if you are logged in to an account you can choose which programmes and release listings are displayed.
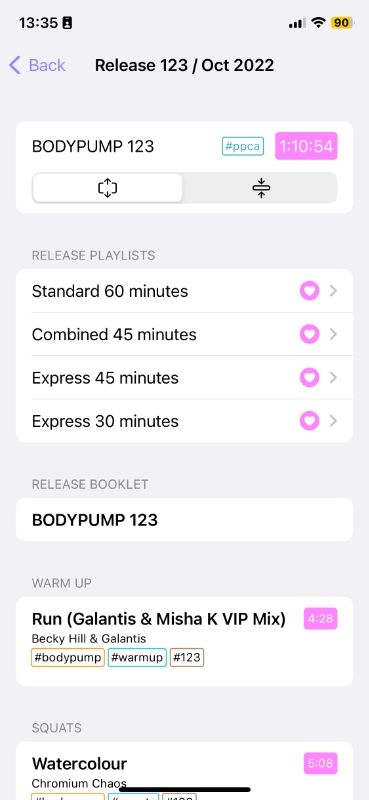
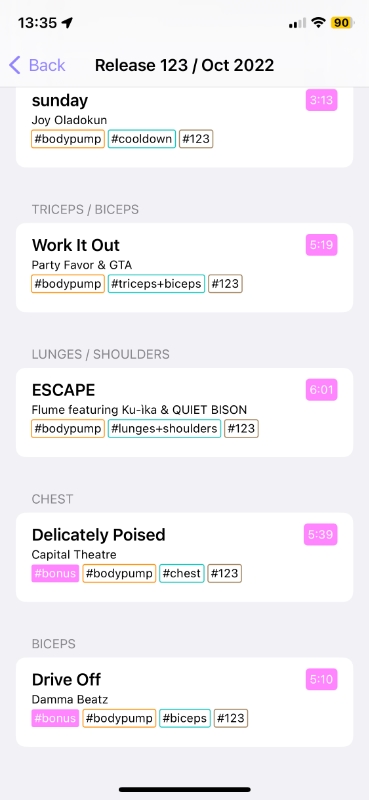

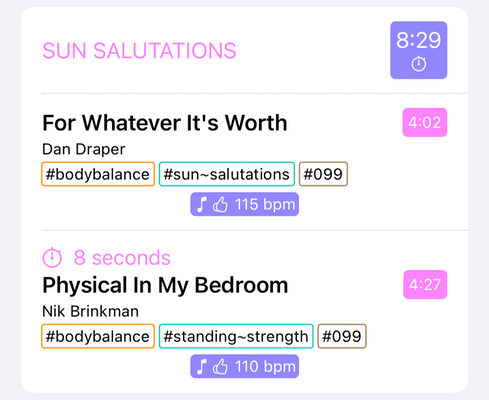
In the first two screens you can see the listing for a specific programme release with the music licence, music running time, the default playlists that can be created from that release and the choreography and music tracks that make up the release. Note that music tracks display tags of various information about the track including whether they are bonus ones. These tags can be used when searching for specific items. The last screen shows the contents of one of the default playlists that can be created. If you own all tracks in that playlist a button will be displayed to allow you to create it ready to teach in class.
What are music licences?
Depending on the country in which you live you will see tags such as #ppca, #ppl, #ppca-free, #pplfree, #stream, etc. These denote the different type of music licences. What exactly are they?
Read this page for a full description of what they are and why it is necessary to have them showing in the app.
The streaming versions were those released during the COVID lockdowns and intended for instructors to teach over the internet to their participants at home. I am unsure of the current legal status of where they can be taught so have left them as a separate entity for now.
Accessing your account
Why create an account? It allows you to add your music and choreography into the app to allow it to be practiced and taught in class. You can also keep track of attendance and a history of your teaching. It also means all your data is backed up to the cloud free of charge. So if you want to move to a new phone – or even use multiple devices – simply sign in on those devices with your Press Play and Go account and it will automatically synchronise your data between them all.
The account is required for instructors to ensure that they are able to access the media and information that is private to them. It is not required for non-instructors who can use it to view the programme details and see the general reports. The account ensures that your data is always saved and that you don’t accidentally lose it all should there be an issue with your device.
Note that you can elect to delete your account at any time and have all your data removed from the system.
You can see the two buttons to login and create an account in the previous section. They appear in the following style when invoked:

The first screen shows the login panel. Type in your valid email address and the account password and it will quickly add all your existing content to a new device. Note that password managers are supported when logging into your account.
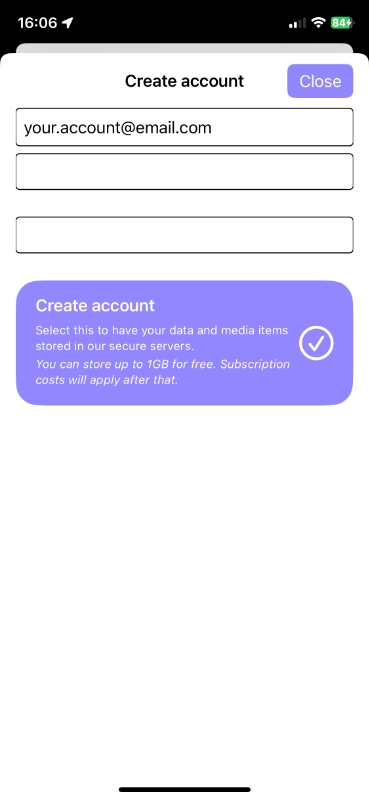
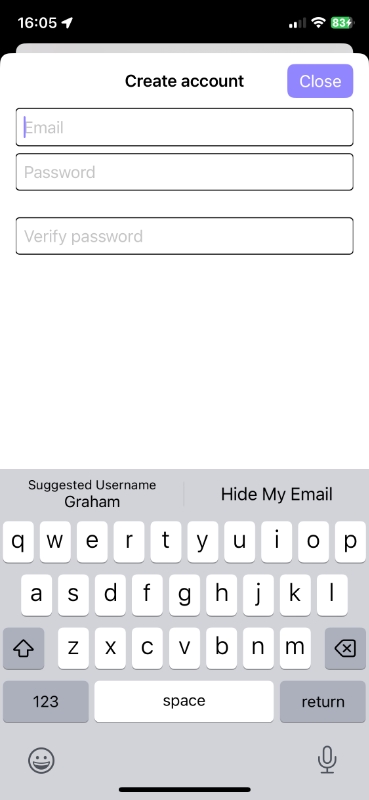
The second screen shows the panel used to create a new account. You simply add a valid email along with a password and confirmation and you have an account. There is no need to supply any other form of identifying information. Note that the third screen shows the option to use Apple‘s Hide My Email functionality when creating a new account. This automatically creates a random email address and password but ties it to your Apple ID. It is then used to log you in to the account without you needing to remember the login details. Choose the option you feel most comfortable using.
Adding my media
You can add your music and choreography to your account. This will allow it to be added to and played on your devices. Note that all your media is restricted solely to your account; it is unable to be shared with anyone else.
To add your music you will need to have it available on a Mac or Windows PC. Only music that is in AAC or MP3 formats can be added. Note that the music files must not be protected – so you can’t use Spotify or Apple Music tracks or anything you bought on the iTunes Store before 2009. In general you will be adding those music files you have purchased and downloaded from your fitness provider or (for the older ones out there) ripped from your CDs. Or even digitised from your cassette tapes for those who have been teaching since the 14th Century.
Your choreography must be in a PDF document. Most of it these days is shipped that way. Simply upload it and the relevant parts will be processed so that they are associated with the music. For older versions where the choreography was in a printed form scan it and then place into a PDF format to be uploaded. There are tutorials on the internet for doing that with a scanner of a smartphone. Search and find the one which best meets your needs. If all else fails email our support and we may be able to help you collate it from the base components for a small fee.
To upload simply drag the files or the folder containing your music files and PDFs on to the large section at the top like this:
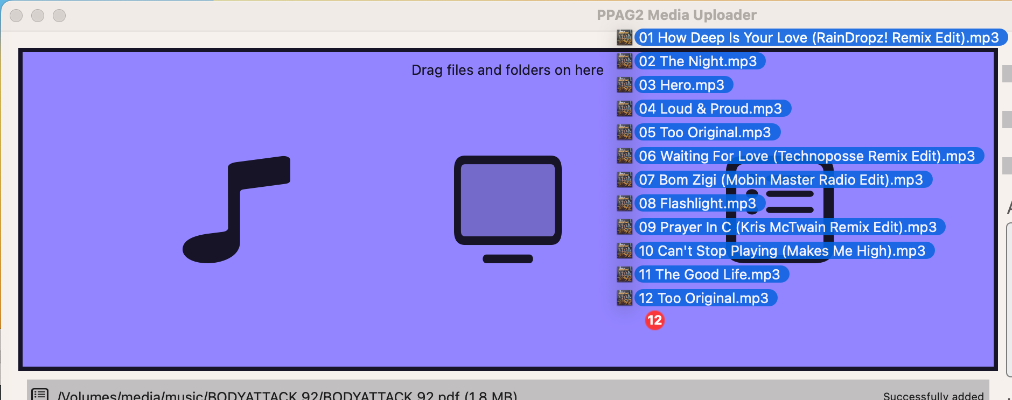
The files will then upload. You will get a status and a progress count. Start with a couple of albums at a time rather than your entire library.
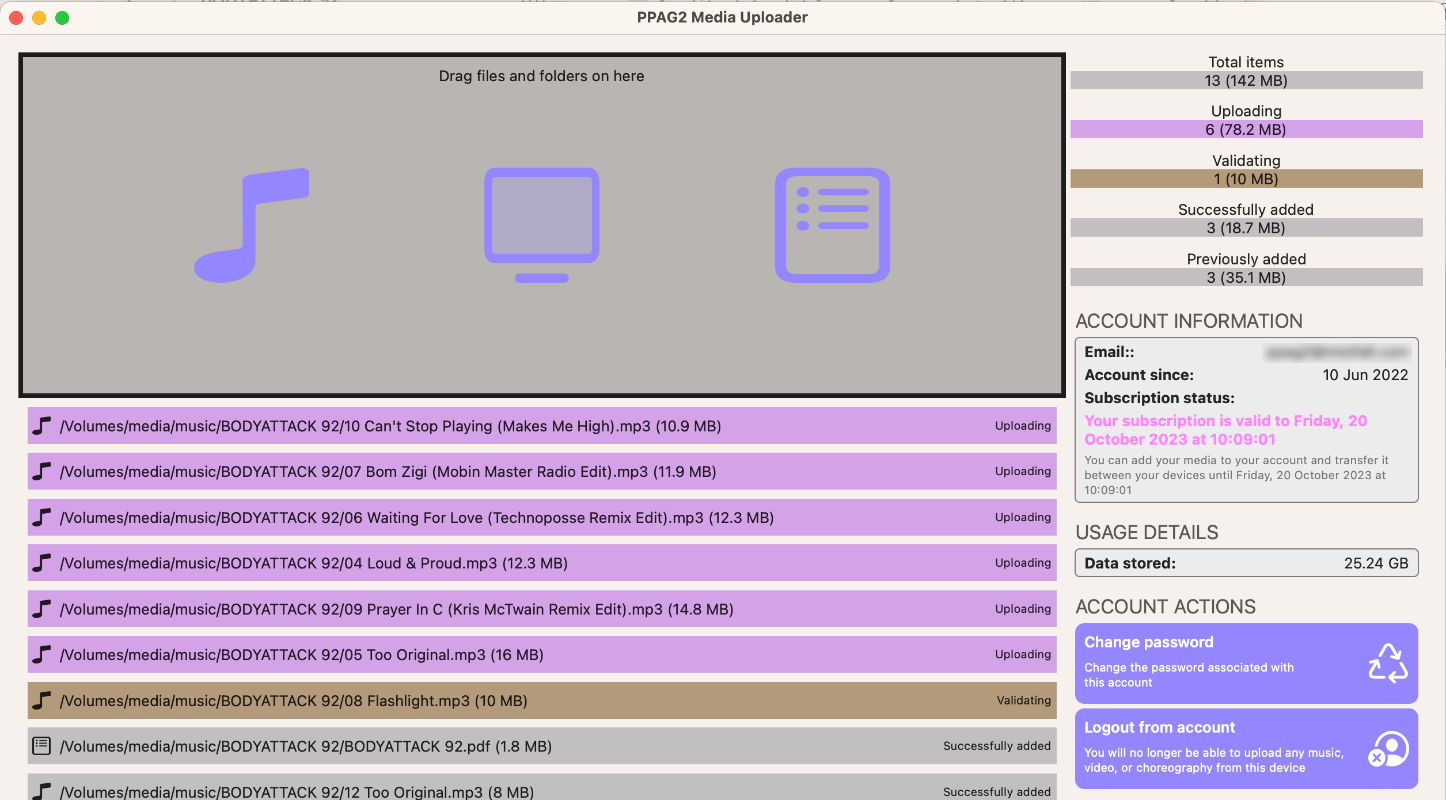
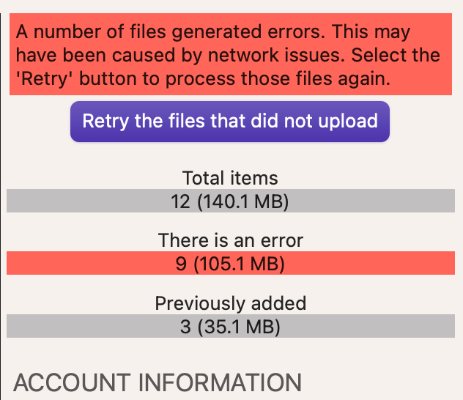
Sometimes you may get an error adding items to your account because network connections aren’t always perfect. If that occurs just hit the Retry the files that did not upload button and it will try to upload the problematic ones again.
Note that if you try to add items to your account that are already present they won’t upload again. This ensures you don’t end up with duplicates and it saves everyone time and bandwidth.
Viewing my media items
After you’ve added your items you can look on your iOS devices to see them. They will only do so after having being processed. If you have uploaded a release that has not yet been checked by our staff you will need to wait until it has been processed. This will normally be within 24 hours as it turns out the staff need to do things such as eat, sleep, and do group fitness classes on a regular basis. Once done you will see the release appear along with an indication that you own the various media.
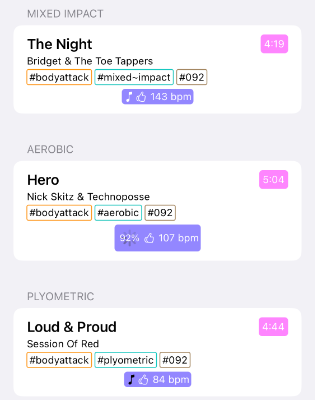
If the media images are shown in white as seen in the note symbol in the Mixed Impact section then it is present on your device and can be viewed and played. If it has a spinner and a percentage count as in the Aerobic section then it is currently downloading. If it is black as in the Plyometric section then you have assigned that item to your account but it has not yet downloaded to your device.
Viewing a programme
Tapping on a programme will show you the entities for that programme. This is in the format of a set of action buttons followed by your mix playlists, the list of all releases in that programme, and a set of playlist formats.
The action buttons
If you have added your music to your account you will see buttons allowing you to create mix playlists. Tapping one will show you the available formats you can create. These will depend on what tracks you have added to your account.

Note that in the Other actions… button you can get options to view and hide the various types of music licences so that you only see those relevant to you.
My Mixes
If you have created your own mixes you will see them listed here. Tapping one will take you into the playlist showing the contents and all the options available for working with it.
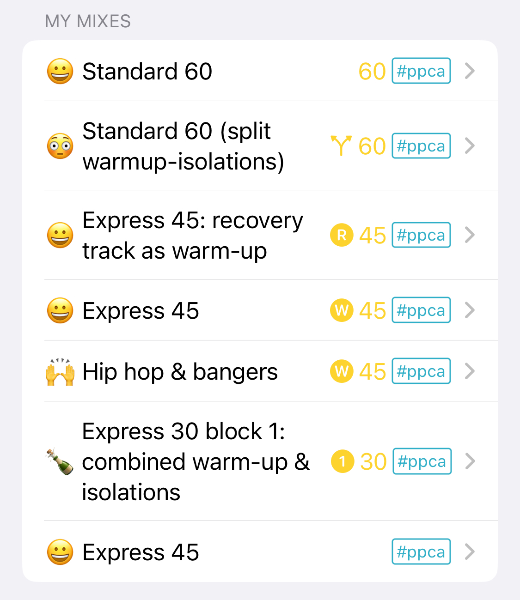
Note that you can change the default emoji and playlist titles.
Release Details
This shows all the releases you have elected to view. If the title is a darker shade then you own at least one item of that release.
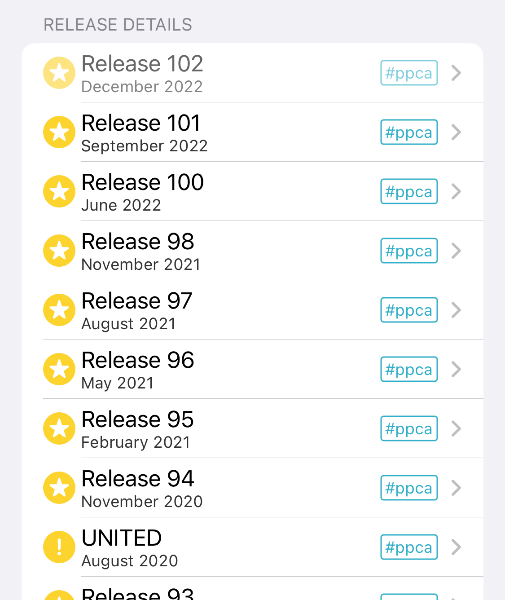
Note that if you go into the Programme Settings section on the home page you can specify if you wish to see all releases, only those you own, or simply hide all details for a programme.
Current Formats
These are the standard layouts used for different types of playlists in the programme. Within each you can set default options such as pause times before tracks and whether to play additional music before and after class. When you create a playlist from within a release or a mix playlist it will set these options on the new playlist automatically. You can always change them within an individual playlist at any time. The ones in here effectively make it a template so you can quickly create a new playlist that meets your usual requirements.
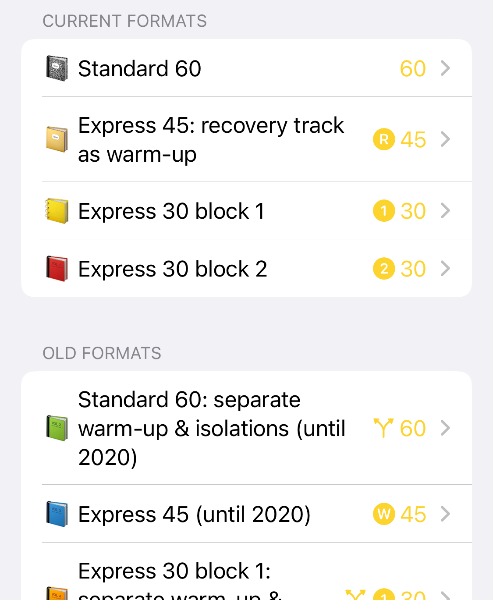
You may also find an Old Formats section showing if the programme has since relegated some playlist layouts to history. However, you can still use them.
Viewing a release
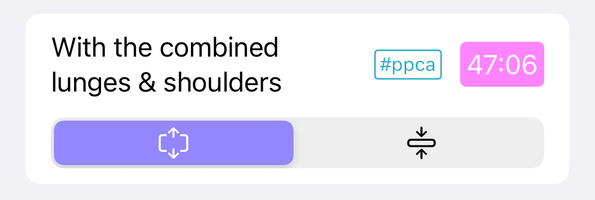
Tapping on a release will show all tracks in there as well as any associated documents and the playlists. The icons displayed in each section will depend on whether you own that particular item. The top of each screen will show the music licence and the overall running time of music in the release. You have seen this earlier in this walkthrough here. You can use the ![]() option to switch between the normal and a more concise view. This is also present in all playlists.
option to switch between the normal and a more concise view. This is also present in all playlists.
For programmes with multiple songs in a block of exercise the tracks will be displayed separately within a collective group. Bonus and alternate tracks will be displayed at the bottom of the list. Those that are bonus or alternate tracks for those in a collective group will be shown as part of the entire block.
If you see a document entry showing the available icon because you have added it to your account you can tap on it to display it:
The same goes for documents and music tracks where you can play the music and see associated choreography for that particular track. This allows you to review all the available entities you own for a track in the one place.
The release playlists section will show the standard classes that can be played using the tracks in that release. If you go into one it will show the tracks which make up that specific playlist. If you own all the tracks there will be a Create this playlist button at the top. If you tap that it will create the playlist with all the default values set in the programme Formats section. This is managed the same way as a mix playlist. See the next section for more details.
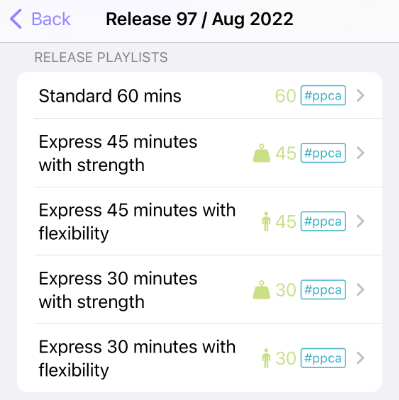
Some playlists have associated icons to indicate they have different flavours in style.
Creating and changing a playlist
When you have created a playlist it allows you to do things with it such as play it in order to teach a class and to practice it so you can nail it when teaching.
The running time of the playlist – including all the pauses you have scheduled – will always be shown at the top. This ensures you know when you have to start so that you always finish on time.
The settings can be changed within each individual playlist. For example you may normally have the app play music after you have finished teaching but if this is the one time in a week where there is another class immediately afterwards then you can turn it off for this occasion.
If you have added choreography it will show for individual tracks as well as a collective entity at the bottom of the page. This means you can view the choreography, technique, and focus items from all available tracks regardless of which release they came from. So instead of having to look through a number of different booklets you have it all laid out in the same order as your playlist.
The action buttons at the top of the screen allow you to perform a number of actions with the most common shown first. You can start pre-class music playing which will play a selection of tracks while you are preparing for the class and waiting for participants to set up. It will play slightly quieter than the class music will in order to allow people to chat.
The next buttons are for practising and teaching. Those options are discussed in further detail here and here.
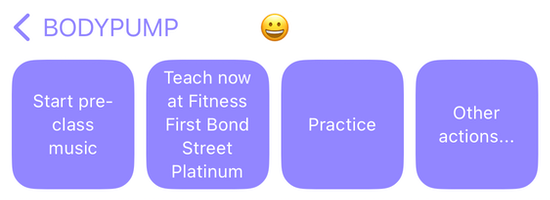
The Other actions… button provides other options such as changing the emoji and name of a playlist. Mixes can be altered in non-standard ways such as removing and reordering tracks or adding extra ones – even from other programmes. You can also duplicate the current playlist so that it becomes a mix. This is especially handy if you teach a new release for a few weeks and then duplicate it. That gives a new mix consisting of those current tracks which allows you to replace a couple of the less popular tracks with ones from earlier releases.
There is also an option allowing you to specify at which location you are teaching. This is useful not only for keeping a record of where you have taught but allows you to generate reports on your attendance at each venue as well as helping you promote your classes.
Depending on the type of playlist you will get options for tracks. In the playlist you will see each section has a header component as well as a list of the tracks it contains.
If you tap on the header component you will get the option to specify how long the class will pause before the track starts. This is so you can allow participants to grab a drink or set up equipment for the next track. There are options during the pause for speaking the remaining time or giving a little musical sting so that participants know when to be ready to start again. If you need longer than a minute pause between tracks then you can enable the option to Wait until the instructor is ready which will then pause the playlist until you restart it.
![]() When you see this double-arrow icon in a playlist you have the option to replace the selected block with another by tapping it. For a playlist in a release that will be the bonus and alternate tracks. For a mix playlist it will be all the tracks of that type that you own. If you have a large music collection you will be able to quickly filter and sort on a number of criteria.
When you see this double-arrow icon in a playlist you have the option to replace the selected block with another by tapping it. For a playlist in a release that will be the bonus and alternate tracks. For a mix playlist it will be all the tracks of that type that you own. If you have a large music collection you will be able to quickly filter and sort on a number of criteria.
If you tap on an individual song in a playlist you will get other options apart from previewing the music and viewing the associated choreography. You can prevent the track from being played in class. That is useful if you need to leave it out for reasons of timing on the day. For blocks with multiple tracks you can add a short pause before each song. This is primarily used if you wish to perform a quick action such as changing the orientation of a mat. The value for this is defined by you in the Settings panel.
The BODYCOMBAT programme gets some special features in the app:
- the upper and lower body warmup sections can be swapped out individually thus allowing you to mix-and-match from different releases. Just tap on an individual track to see your available options.
- if you own the releases that had the floorwork-based sections of the warmup you can remove it when using those releases or if you’re in a particularly evil mood add that section to other warm-ups.
- the 60-minute version allows you add in the short piece of music after track 8 has finished so that your participants can run around the room just like in the old days.
Practicing for your class
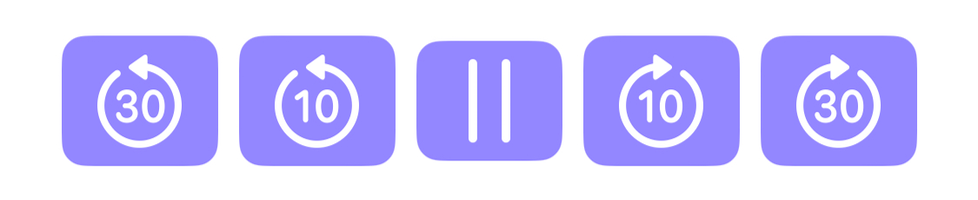
This is the section when learning a new release or reviewing items in a mix. When invoked it will start playing from the first track. You can use the row of actions to play, pause, and skip back and forward through a track.
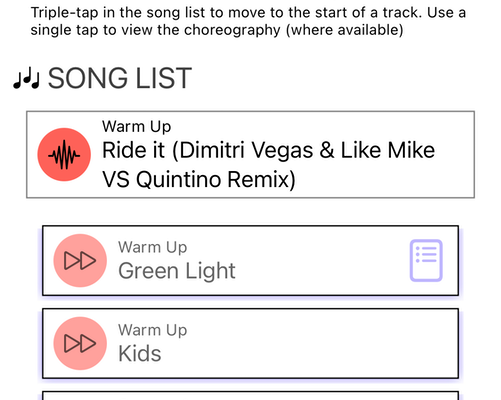
If you wish to jump to a different track triple-tap on an item in the song list.
Why require a triple-tap to change songs?
It reduces the chance of accidentally tapping on an item and having something unexpected affect the flow of your class.
Single-tapping on an item in the song list will display the choreography if you have added it; that’s handy to see how it ties in with the music playing the background.
The items in the speed setting allow you to change the speed of the music when practising. Slow it down if there’s a complicated move that you find yourself needing to walk through before feeling confident enough to do at normal speed. Conversely put the music on faster if you’re just walking through the choreography in your mind to verify that you have it down pat.

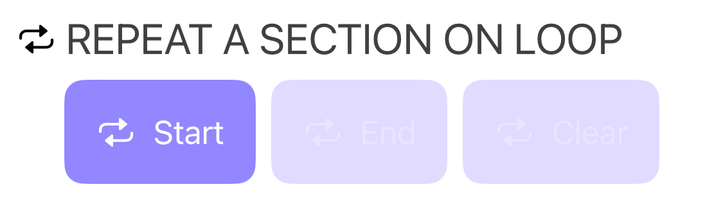
The repeat section allows you to specify a part of the practice that you want to loop around. Again this is handy if you are trying to perfect a section of the choreography. Tap the Start button, play through or skip to the relevant part and tap the End button and it will loop until you hit the Clear button.
You can tie the repeat section in with the speed setting items if it’s a really awkward section you’re trying to learn.
Teaching your class
Probably the most important screen once you’ve created your playlist. It’s a very simple display because once you’ve started the class you want as little distraction as possible. There are two main parts. The first is the current class status.
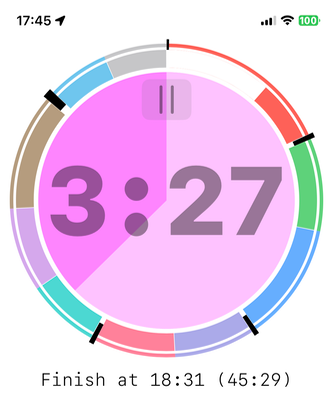
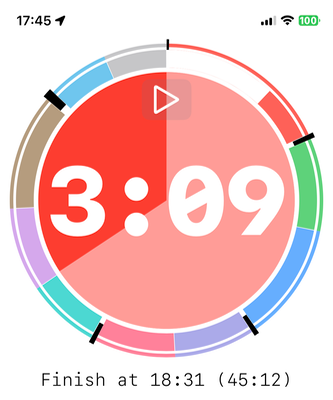
This is a large circular display. The centre shows the remaining time in the current block counting down. It can also show it counting up if you prefer to work on how far you are into a track rather than how long it has to go. You will find the option for that in the Settings screen and it can also be changed for individuals playlists. As the block progresses you will see the inner circle complete. Tapping this circle will pause the class. Tapping it again will restart the class. You can see the different states in the images above.
The outer circle shows all tracks in the playlist and the progress through them. The spacing between those tracks shows the scheduled pauses and also any ‘wait for instructor’ options.
The display is large enough so that you can face it to the class and they’ll be able to see it across the room. That can be useful when doing classes involving weights or HIIT where your participants will be encouraged to keep going because they can see how close to the end of a track they are.
The song list works the same as the practice one. You can tap on a song and see any assigned choreography for it if you suddenly go blank. Skipping or restarting a track should be a very rare event which is why it requires a triple-tap to prevent accidental actions when you are probably out of breath, sweating heavily, and don’t quite have the delicacy of touch you normally do.
After your class
After the class has finished it will play music if you have set that option in the playlist. This will be from the same programme and the same type as the last track. This ensures if you finished with a gentle meditative piece of music you’re not going to suddenly get a poppy power ballad blaring out a few seconds later.
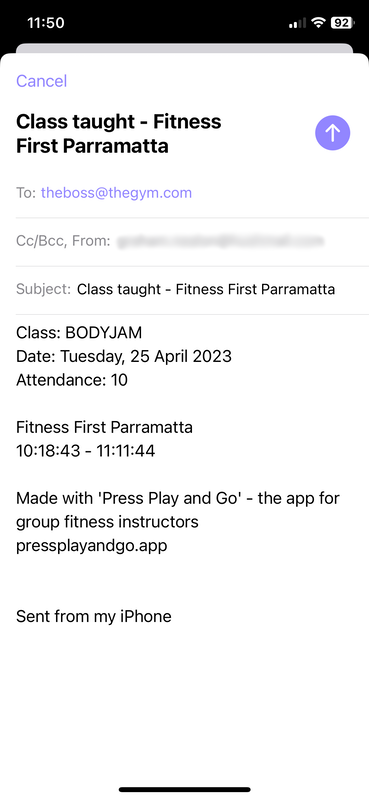
You will also get a prompt for class attendance. It will generate a best guess based on recent weeks. If you do not wish to add that data at that time simply tap the Done button. You can change those details later in your class history (see here). If you do not wish to save any attendance data you can disable the prompt in the Settings panel.
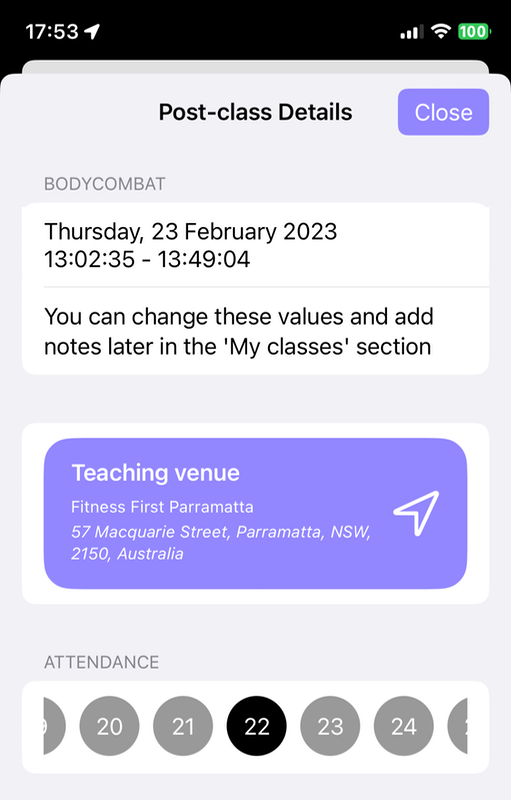
The purpose of tracking attendance is that you can generate reports on how it varies over time at different locations. It can provide evidence when in discussions with management or when helping to determine what external factors may be affecting the number of participants.
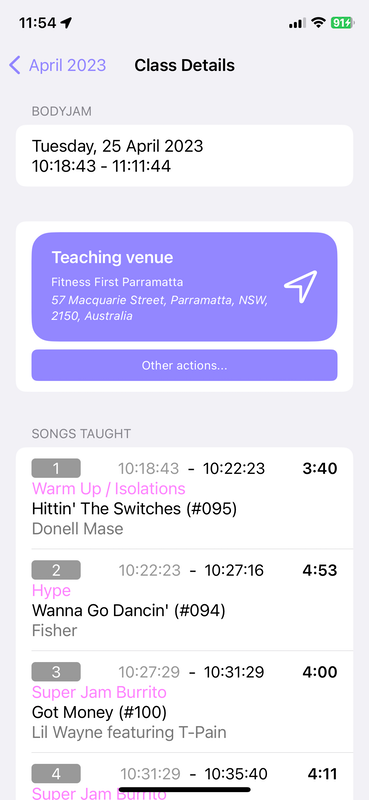
Your class history
Each time you complete a class it will keep a record of the tracks you taught and the details associated with the class. You can also attach notes to that class for future reference.
If you have email enabled on the device you can generate an email with the class details. This is handy if you need to send the class details through to management. You can also create a poster with those class details which you can share directly from your phone on various social platforms to promote your classes.
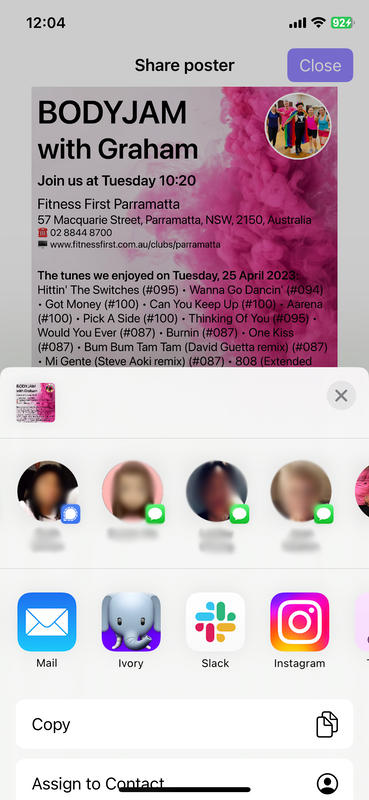
Since it uses the share sheet you can send to any of your apps which appears in it.
My media
This lists all the media – music and choreography – that you have added to the system. It will show the breakdown for each programme. Selecting each programme will show the total size of your content for that programme along with the total running time and number of pages.
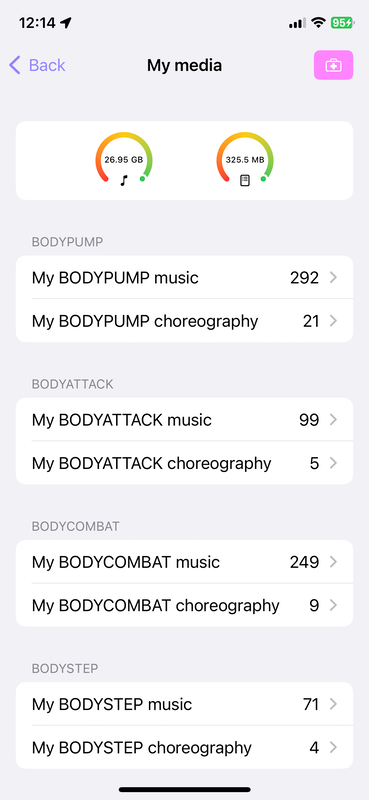
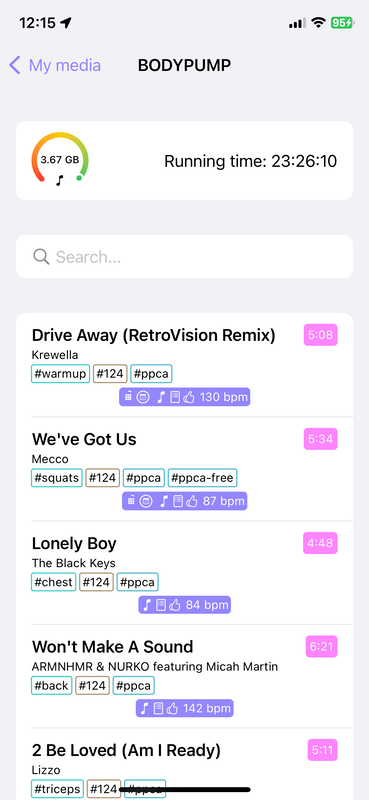
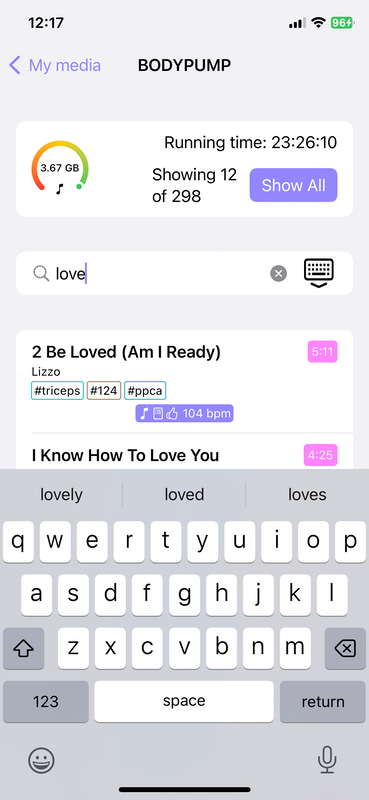
You can use the Search… field to drill down and find specific tracks.
Reports
There are two types. Public and your personal ones. Your personal ones and the data from which they are generated is never seen by anyone other than you.
The public ones show overall values for types of classes and attendance and that can be broken down into a country level. Your private ones show your data that can be broken down to the level of teaching venues and show recent types of trends for you. As more data is added more reports will become available for your use.